How to Stretch Lower Back to Relieve Pain
Lower back is one of the most important parts of your body; you rely on it for almost every form of movement, from walking to lifting to carrying. Because the lower back region of the body is so critical to our everyday ability to function, knowing how to keep it limber and pain-free is also of vital importance.
With that in mind, we’ve put together this article to explain how to stretch the lower back. Within this article you will find not just information on stretches for lower back in general, but also information on stretches for lower back pain relief specifically. We hope you find this information helpful for understanding how to best take care of your lower back.
How to Stretch Lower Back
There are many basic lower back stretches to choose from when it comes to keep yourself limber and strong, but these are some of the easiest and most effective.
Stretch 1: It is very simple; all you need to do is lie flat on the ground and pull your knees up to your chest. Hold this position for about half a minute, then release. You can repeat this exercise if you would like, but be careful to not overexert yourself.
Stretch 2: This stretch is sometimes called the cat stretch (or the cow stretch). To perform it, all you need to do is get down on all fours and then arch your back up; go as high up as you physically can (without straining or overexerting yourself)
Stretch 3: This stretch is quite possibly the most basic option of all, to the point that it requires virtually no effort from you whatsoever. All you need to do is push your backside right up against a wall and then raise your legs into the air parallel to the wall. This stretch can help relax both the muscles in your lower back as well as the muscles in your upper thighs. In any case, because this stretch requires very little in the way of physical effort on your part, you should be able to hold this pose for about ten minutes (which is the most commonly recommended holding time for an exercise like this).
Stretches for Lower Back Pain Relief
While the stretches we mentioned above are certainly capable of helping to relieve back pain, in most cases they qualify more as limberness exercises; they can help with your flexibility and with releasing built up tension within your lower back. In contrast, the lower back stretches we will tell you about next are some of the best when it comes to pain relief for your lower back.
- The 2-Knee Twist Stretch. To perform this stretch, you must first lie down flat on the ground. Then, pull your knees up to your chest (just like you would in the first stretch we discussed up above). Then, take your knees to your left side (while keeping your shoulders flat on the ground). Hold yourself in this position for a short time (how long depends a great deal on your physical limitations; some people hold for thirty seconds while others will hold the position for up to two whole minutes) and then bring the knees back to the center position. After that, repeat the motion but lower your knees to the right side of your body instead (and hold that position). You can repeat this stretch as many times as you feel comfortable with, but as always make sure you don’t push yourself too hard and risk injury.
- The Sitting Twist Stretch. This one is popular for how it can be done virtually anywhere you’re sitting down, whether that’s in your office at work, at home on your couch, or a plane flying across the country. To perform this stretch, hold onto your seat’s left arm-set. Then, twist your body’s right side towards that same armrest. Hold the position for as long as you are comfortable with (most people hold for about a minute or so), and then repeat this stretch for your opposite side (holding onto the right armrest and twisting your left side). You can, of course, repeat these stretches as many times as you want or need to.

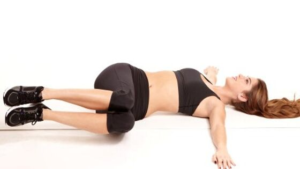
- The Pigeon Stretch. This lower back stretch is slightly more involved than some of the others we’ve discussed so far. To begin, start on all 4 and face the ground. Then, bring your right leg up and under your torso (have your leg at almost ninety degree angle if possible, or as close as you can get without straining yourself). Then, lower your body forward (until your forehead is almost touching the ground, or touching your hands if you chose to place them closer to your face) and hold that position for a short time (some people hold for a minute, while other choose shorter or longer holding periods). Then, switch legs and repeat the process.
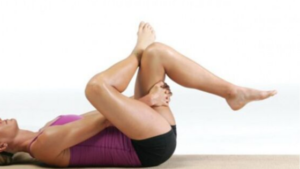
- The Thread the Needle Stretch. This stretch is, like some of the other ones we’ve been discussing, a bit more complex than the simple stretches from the beginning of the article. For this one, begin with the knees together and facing up towards the ceiling (or the sky, if you prefer to do your stretching outdoors). Then, cross the left leg over the right one (so that the left ankle touches the right knee). Once you’re comfortable in that position, take your hands and slowly draw the right knee towards you (with your left leg still crossed over it). After holding that position for a short time (most people will hold for about two or three minutes, but you can do more or less time depending upon your personal preferences and stamina), switch positions to do the opposite leg (crossing your right leg over your left leg instead). And as with all the stretches we’ve discussed today, make sure to not push yourself too hard and do only what you feel physically comfortable doing.